Hi again everyone! It's Maria from
Not Only Quilts and I'm so happy to be back here at Moda Bake Shop to share my third tutorial with you all. This time we'll be making a really fancy pot holder!
"Just a pot holder?" you say. "How boring!"
Well, this pot holder is anything but boring; it's fancy and fun to make. =)
And the folded star technique you learn here can be used for so many other things: make it bigger for a pillow cover or make it smaller for an adorable ornament! It's the perfect way to use a few spare fat quarters for a gift. I recommend you read the entire tutorial before beginning this project.
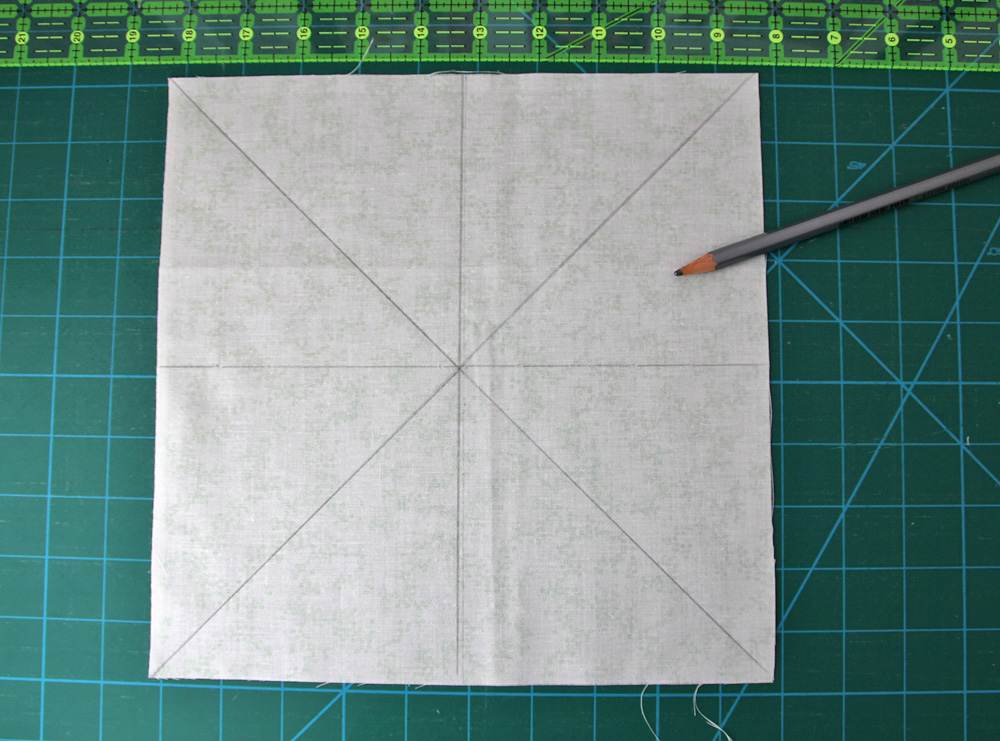
* Cut (1) 10" x 10" square from your backing fabric and (1) 10 x 10" of your drawing and sewing fabric. For one of these squares I substituted the drawing and sewing one with an ugly fabric from my scrap bin as it won't be visible when we're done). That's all we need and the rest can be placed in your scrap bin.
將小布片在4"那邊往裡折燙1/4"
64片都是
Step 5 - Select layout Now we're going to select the layout of our star. Here are some of my test versions. You should have 8 pieces in the layout, 2 of each fabric. I ended up going with #1 because it felt nicely tied together when it started and ended with the same color and slowly faded to blue and back to green.
排出星星輪廓
每組共八片
二組二組重複排列共有八組
Step 6 - Creating the star base Now we're going to start making the star. First we need to get all the pieces in place, keep the test version you decided to go with next to you when doing this for reference, as it's easy to accidentally get the fabric in the wrong order.
Start with the vertical line; place your centerpiece exactly by the horizontal line the fold at the line, right side up while still centered over the vertical line. A scant ½" down, place your next piece and pin in place, this distance has to be the same all around your star so it's very important you keep it still. In my photo below, you can see my reference pile next to it. =)
開始第一組
每一片距離1/4"
用珠針固定
距離要一致 星星才不會偏移
Place the rest of the pieces a scant 1/4" down from each other's edges and pin in place. Try to keep this measurement the same all around your star since your star will be wonky otherwise.
Repeat for the other side of the line until you have this. Make sure the top pieces on each side
touch but don't overlap. This is very important.
對面也是一樣對稱排列
Draw a line in the middle of your pieces (5" in from the edge) using a disappearing marker and sew along the line using your walking foot - otherwise you risk your pieces shifting. Choose a thread that blends in nicely with your bottom fabric (in my case, the solid green) because it will be most visible there.
在中間車一條線
Remove the pins from your first row so you can flip the fabric from side to side. Complete your second row using the exact same measurements, carefully folding away the already stitched in place row and keeping your top piece touching them, but not overlapping, like this.
左右二邊也是
一樣排列
中間車一道線
移除珠針
Draw your centerline with the disappearing marker and sew in place. This time you have to first sew one side, and then the other so backstitch a few stitches in the center.
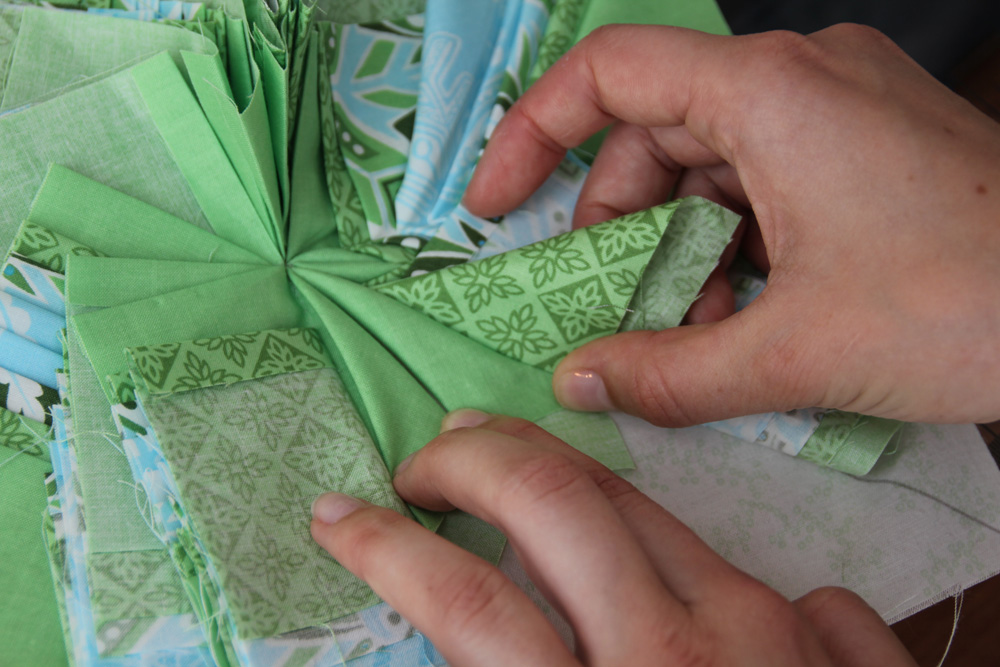
祝你順利成功 手作愉快Step 7 - Folding your star This step might seem complicated but it really isn't, it just requires patience and maybe one or two practice folding rounds. So the first time, you might want to just pin in place and see where that leaves you because it can be a little tricky to get the folds even the first time.
Many of the written descriptions below can seem very confusing, however, just click the photo below them and enlarge it and it should become crystal clear what I'm trying to get across. =)
Separate two piles of fabric by flipping them to the sides, like this.
Starting on your right hand side, take the top piece, fold it over, wrong side towards wrong side so you get a triangle with a little leftover at the bottom. Enlarge the photo below and you'll see exactly what I mean.
Lie it down towards the scrap fabric like so.
And fold it back over towards the seam again, right side to right side and the first fold is done!
While holding onto your right side fold, do the same thing to the left one. Fold it wrong side towards wrong side.
Lie it down towards the scrap fabric and then fold it back over towards the seam on the left side.
And the first star center is complete! Now we only need to do the single folds for the rest of the pieces.
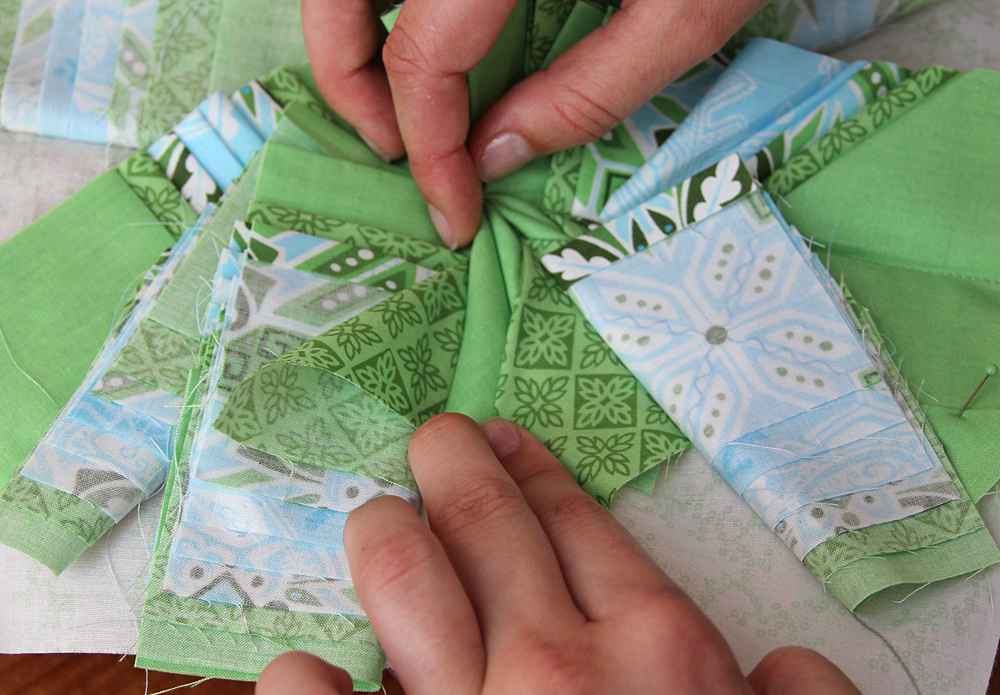
On the right side (always start from the same side), fold it down, wrong side to wrong side like we did with the first two pieces.
Then simply lay it over your already folded pieces.
Fold the left one the exact same way.
While holding the one's you've already folded in place, fold the next layer too.
Pin in place.
And then sew a sort of V shaped row of stitches, high enough to secure all three layers but away from the parts that will be visible when folded, like this.
Fold two more and stitch again.
And repeat. Make sure you remove all pins after sewing because it will be very difficult to retrieve them afterward. =)
For the last fabric, only pin in place... don't sew yet.
Repeat 8 times, until the star is ready. Admire your hard work a little before continuing.
Now you can add batting and backing, sew around the edges, and cut a circle to make a round potholder. I preferred a squared one so I'll be attaching some corners to it.
Step 8 - Finish the front Now we're going to take the 4 triangles we've already cut and use them to make our piece square. I made them big so no matter how you've folded, they should cover your ends. I can't give you exact measurements here as it depends a little on how far apart you've placed your pieces and how you've folded. So here we do a little trial and error. Place your triangles wrong side up far enough up to cover the folds of your star but low enough to cover the corners when folded down, again a couple of pictures are more explanatory I think:
Before stitching, flip over your pinned triangles to make sure they cover all they should, like so:
Stitch along your pinned rows to get them in the correct position. Trim off the triangle edges sticking out.
Step 8 - Back, batting and quilting Add batting (I use just one layer of normal cotton batting, this potholder has so many layers of fabric, you really don't need any extra protection from heat when using it) and backing to your little potholder. Baste and quilt as desired, I choose to do a simple echo of the star shape.
Step 9 - Binding I know most of you already know how to do this, so then just skip this part and bind with your preferred method. But I remember from making my very own first potholders how difficult it was to get a decent looking edge and hanger on the darn thing, so in case there's anyone else out there like me a few years back, this section is for you =)
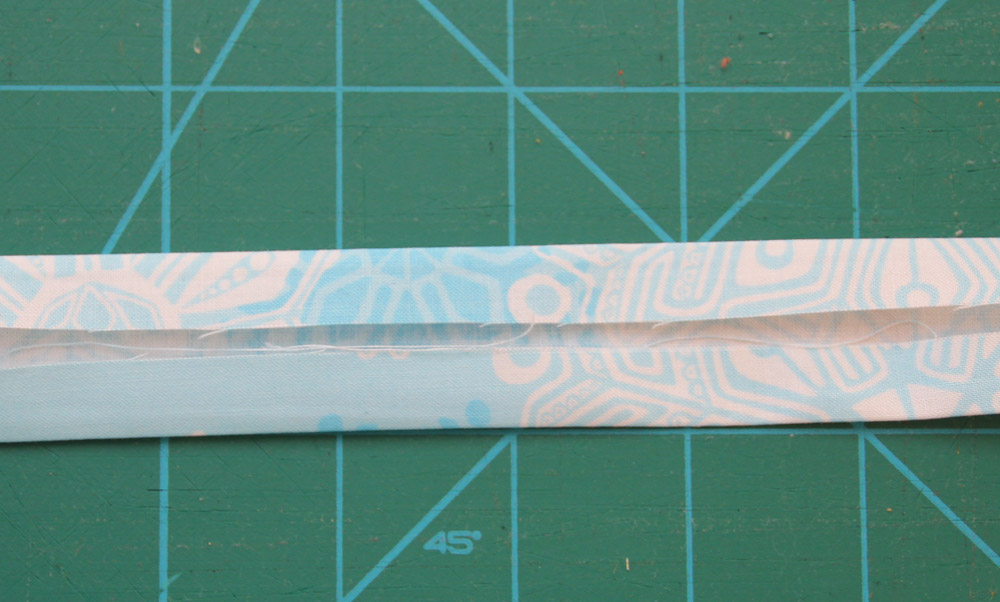
Cut two 2" long strips from your desired binding fabric from the 18" end, join them to make one continuous binding strip. We're going to make single fold binding, so 2" wide is wide enough.
Fold the strip in half, wrong sides together and iron it, then open it up and iron the edges towards the center fold, something like this. I know mine doesn't match perfectly (I got lazy and made it with my bias band maker).
Start in one corner of your potholder. On the wrong side of your potholder, pin your binding wrong side up from the very end and start sewing from the top. Use a 1/4 inch seam allowance.
Sew until you're a 1/4 inch away from the bottom edge. Backstitch and clip your thread.
At the corner, fold back your binding to a 45 degree angle, like so:
Fold it back at the right edge down towards the next side you're about to sew. Again, this sounds more complicated then it is. Just look at the photo and then you start your stitching 1/4" from the edge where the little arrow is, it will be exactly in line with your last row of stitching. Be careful not to catch your fold with your stitching when backstitching.
Continue around 3 corners but don't do the last one, so you'll end up with these flips on 3 corners.
When you come to the last corner, stop an inch or so before the end. Take the starting point binding and pin it in place around the front.
Sew the final inch or so all the way to the edge.
You should have a fairly long piece leftover at this point. You can now shorten it to 4" sticking out over the edge.
Fold over your binding and pin in place, making sure you get pretty 45 degree corners as you go. I'm normally very lazy and never pin my bindings, but for this part of the tutorial I wanted to show the recommended way of doing it when you're a beginner - to ensure an even and nice looking binding as it easily slips away from you when machine sewing it in place if you're not used to it. =)
Before you sew it all in place, take the hanger piece sticking out and fold it back over itself, right sides together, and 1/8" from the edge, sew a few stitches back and forth to close it.
Flip it back and into the fold with the seam like so.
Now start stitching at the end of the hanger, closing it off as you go and follow it all the way around. Stop a few inches from the end and flip the hanger underneath the end so you make the little loop with the same seam as you end the binding.

One ~10" big, super fancy folded star potholder! A lovely but usable decoration for your own kitchen, or the perfect gift for the person who has everything!
I hope you've enjoyed reading this tutorial as much as I enjoyed making it! If you end up making one of these, I'd love to see it! Please send me an email {
maria@idztech.com} with a picture, as I'd be so happy to feature it on my blog =)
Maria Wallin


")


 作法介紹
作法介紹